Difference between revisions of "3rd Party VMS/Control4"
(→NVR Firmware) |
(→NVR Firmware) |
||
| Line 79: | Line 79: | ||
*N54B3P | *N54B3P | ||
|[https://dahuawiki.com/images/Firmware/Control4/Customer_NVR5XXX-4KS2_Eng_Control4_V3.216.10BE000.0.T.20181114.zip <ul class="fa-ul"> <li><i class="fas fa-arrow-alt-circle-down fa-4x" style="color:darkred;></i></li></ul>] | |[https://dahuawiki.com/images/Firmware/Control4/Customer_NVR5XXX-4KS2_Eng_Control4_V3.216.10BE000.0.T.20181114.zip <ul class="fa-ul"> <li><i class="fas fa-arrow-alt-circle-down fa-4x" style="color:darkred;></i></li></ul>] | ||
| + | |- | ||
| + | | | ||
| + | *N42B1P | ||
| + | *N42B2P | ||
| + | *N42B3P | ||
| + | |[https://dahuawiki.com/images/Firmware/Control4/Customer_NVR4XXX-4KS2_Eng_Control4-DH_V3.216.10BE000.0.T.20190315.zip <ul class="fa-ul"> <li><i class="fas fa-arrow-alt-circle-down fa-4x" style="color:darkred;></i></li></ul>] | ||
|} | |} | ||
Revision as of 18:00, 22 April 2019
Contents
Control4
Overview
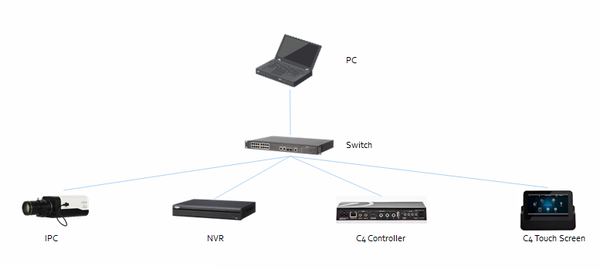
Using this driver allows a Control4 dealer to add an icon in the watch menu. This will enable the Control4 System to use the Monitor-Out/HDMI/VGA connector to integrate Dahua devices.
Instructions
Prerequisites
- Control4 Composer
- https://my.control4.com/ Account
- Dahua Device configured for Static IP or DHCP Reservation
Driver Features
- Allows NVR Icon on Watch Menu, and Connection paths for HDMI and VGA into a Control4 video system
- Event Connection for Triggers FROM NVR (using either, connection binding or Composer Event)
- NUMBER buttons select that channel (example: Button 6 = Camera 6 on the TV)
- Setup RED, GREEN, YELLOW, and BLUE buttons to trigger different views on TV
- Uses Control4’s cable Proxy
- Connection paths for camera proxy interface
Driver List
Dahua Firmware to Enable Control4 Integration
XVR Firmware
| Model | Firmware |
|---|---|
| X72A2A | |
| X51A3E | |
| X52A3A | |
| X52A3N | |
| X51A1E | |
| X51A2E | |
| X72A3A | |
| X54A5L | |
| X58A5S |
NVR Firmware
| Model | Firmware |
|---|---|
|
|
|
IP Camera Firmware
| Model | Firmware |
|---|---|
| x | [xx |
NVR Setup
Note: for faster installation, use Control4 SDDP!
Using Control4 SDDP for installation:
- Click on the Discovered Tab and find the nvr:
- Enter Username and Password for NVR
- Recommend setting IP address to Static or use DHCP Reservation
- Make connections for NVR according to standard Control4 procedures
Setup NVR Streams (H.264, MJPEG)
Note: Certain older Control4 equipment require MJPEG for video stream (HC800, HC250, Infinity Touchscreens etc..). If these older devices are used at property, the dealer MUST enable Sub Stream and set to MJPEG. If dealer is using T3 and EA controllers, MJPEG does not need to be used
- Log into NVR or use GUI and go to Setup
- Select IMAGE, ENCODE
- Choose Proper Channel (repeat for each channel)
- Change Main Stream Settings to the following (note: these settings are best practices; individual systems may require modification of these settings for certain applications)
1. Code-Stream Type: Continuous
2. Compression: H.264
3. Resolution: 1280*720(720P)
4. Frame Rate(FPS): 13
5. Bit Rate Type: VBR
6. Bit Rate: 1024
IF MJPEG is required do the following:
1. Enable Sub Stream on Channel
2. Compression: MJPEG
3. Resolution: 704*480(D1)
4. Frame Rate(FPS): 13
5. Bit Rate: 1024
Camera Viewing Setup
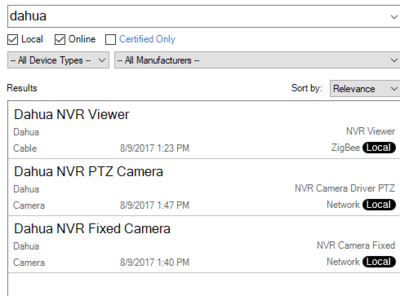
- Search for Dahua in Search of ComposerPro
- Add PTZ and Fixed cameras for all cameras you want to view in Control4
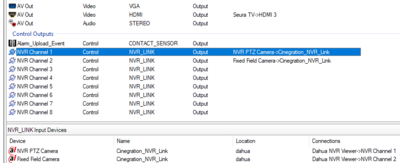
- Make connection for each camera to the correct channel on the nvr
- By default, the driver chooses the video stream from the NVR. This is acceptable for 1 to 2 cameras only. If more cameras are required, Select Driver Actions: Set Video from Camera directly, then enter the camera ip address, username and password.
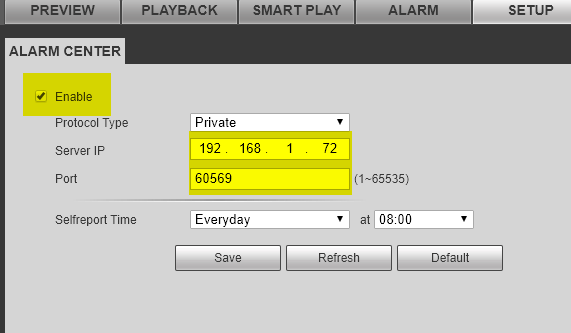
Setup Event Notification (Trigger C4 FROM NVR)
1. Log into NVR or use GUI and go to Setup
2. Select Network, Alarm Center
3. Enable Alarm Center
4. Protocol Type: ALARM CENTER
5. Host IP: IP Address of Director
6. Port: Port listed on Driver Property: Server Communication Port
7. Self-report Time: Never
8. Select Event (choose which event you want to monitor)
9. Choose which event you want Control4 to be notified of
10. Create proper event action. The event action should be Alarm Upload
11. In Composer, Select: Alarm Upload Event and add actions associated with event
NOTE: Currently there is only a single notification that can come from the NVR.


